Foolproof Guide: Pick, Peel, Cut, and Roast Butternut Squash
Butternut squash, with its elegant pear-like shape and vibrant orange flesh, is a true culinary gem, especially as the cooler months arrive. Its naturally sweet, slightly nutty flavor makes it incredibly versatile, perfect for everything from hearty soups and comforting purees to savory roasted sides. However, for many home cooks, the mere thought of tackling this robust gourd can be a little intimidating. Its hard skin and unique shape often lead to hesitation, transforming what should be a delightful cooking experience into a daunting chore. Fear not, fellow food enthusiasts! This comprehensive guide is designed to demystify the entire process, transforming you from a butternut squash novice into a confident culinary artist. We'll walk you through every step, from selecting the perfect squash at the market to mastering a clever kitchen hack to cut and roast butternut squash with ease, ensuring tender, caramelized perfection every time. Say goodbye to struggling with slippery surfaces and difficult peels, and prepare to unlock the full potential of this magnificent vegetable.Mastering Butternut Squash Selection: Picking the Best Gourd
The journey to perfectly roasted butternut squash begins long before you even pick up a knife – it starts with selecting the right one. While even a "not-so-perfect" butternut squash is often still quite good, knowing what to look for can elevate your dish from good to exceptional, guaranteeing optimal flavor and texture.- Skin Deep Insights:
Focus on the squash's exterior. You want a butternut squash with a deep, uniform orangey-beige color. Avoid any squash with green patches, which indicates immaturity, or any deep bruises, cuts, or blemishes, which can be signs of spoilage or damage. Crucially, look for a matte finish, not a glossy one. A shiny surface can sometimes suggest an unripe squash or one that has been waxed.
- The Weight Test:
Pick up a few squash of similar size. The one that feels significantly heavier for its size is usually the best choice. This density indicates a rich, well-hydrated flesh with plenty of natural sugars and less air, promising a more flavorful and satisfying yield. A light squash, much like an under-ripe melon, suggests it might be dry or lacking in development.
- Stem Clues:
Always opt for a butternut squash with its dark brown, intact stem still attached. The stem is a sign of freshness and proper harvesting. If the stem has fallen off, it could indicate that the squash is past its prime, has been handled roughly, or is beginning to dry out, making it more susceptible to bacterial contamination.
The Ultimate Kitchen Hack: Prepping Your Butternut Squash with Ease
This is where many home cooks encounter their biggest challenge: peeling and cutting. The hard, sometimes slippery skin can be daunting. But with a simple kitchen hack, prepping your butternut squash becomes a breeze, turning a once-dreaded task into a straightforward step. First, always start by giving your squash a good rinse under cool water and a light scrub to remove any dirt or debris. Pat it completely dry with a clean towel; a dry surface is a safe surface when working with knives.- The Microwave Softening Trick:
This is your game-changing kitchen hack! Place the whole butternut squash in the microwave for 30-60 seconds. This brief burst of heat generates steam within the squash, subtly softening the skin just enough to make it much easier to peel without actually cooking the flesh. Be cautious when removing it, as it will be warm. If you don't have a microwave, a similar effect can be achieved by baking the whole squash in an oven at 375°F (190°C) for 15-20 minutes, then allowing it to cool slightly before handling.
- Trim the Ends for Stability:
Place your now slightly softened squash on a sturdy cutting board. Using a sharp chef's knife, carefully slice off about a half-inch from both the stem end and the base. This creates two flat, stable surfaces, which are crucial for safe and efficient handling during the next steps.
- Efficient Peeling:
With the ends trimmed, stand the squash upright on one of its flat ends. Now, using a Y-shaped vegetable peeler (which tends to be more ergonomic and effective for larger, oddly shaped vegetables than a swivel peeler), glide the peeler downwards, removing strips of the tough outer skin. The microwave trick will make this process significantly smoother and less strenuous. Work your way around the entire squash until all the orange flesh is exposed. For more ingenious ways to handle tricky squash, check out The Butternut Squash Hack: Effortlessly Cut & Roast.
Precision Cutting: Dicing Your Squash Like a Pro
With the hard work of peeling behind you, the next step is to master the art of dicing. Uniformly cut pieces are key for even cooking, ensuring every bite is perfectly tender.- Halve Lengthwise:
Lay the peeled squash on its side on your cutting board. Carefully slice it in half lengthwise, from top to bottom. A sharp knife and a steady hand are essential here. You'll now have two halves, one with the bulbous seed cavity and the other mostly solid neck.
- Scoop Out the Seeds:
Using a sturdy spoon (a metal ice cream scoop works wonderfully), scrape out the stringy pulp and seeds from the bulbous half. Discard the pulp, but consider reserving the seeds! Just like pumpkin seeds, butternut squash seeds can be rinsed, tossed with a little oil and salt, and roasted for a delicious, crunchy snack.
- Divide and Conquer:
Place both squash halves cut-side down on your cutting board. This provides stability. Now, slice each half crosswise to create four more manageable sections. This makes handling the squash much easier for precise dicing.
- Slice into Strips:
Take each of the four sections. Lay them flat and carefully slice them lengthwise into approximately 1-inch thick planks or strips. Aim for consistency here.
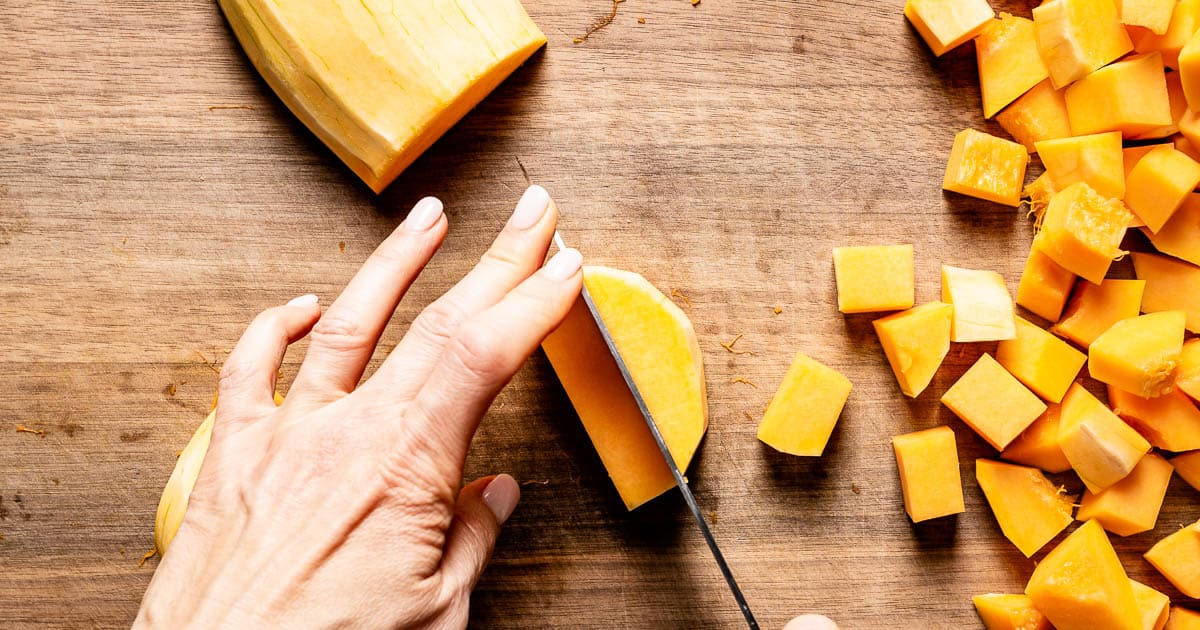
- Cube with Care:
Stack 2 or 3 of these strips on top of each other (or work with them individually if you prefer more control). Then, slice crosswise into 1-inch cubes. Continue until all your butternut squash is neatly diced into even pieces. This precise dicing is crucial for our roasting step.
Roasting Butternut Squash to Perfection: A Simple Recipe
Now that your butternut squash is perfectly prepped and diced, it's time for the grand finale: roasting. Roasting brings out the squash's natural sweetness, creating a tender interior and beautifully caramelized edges. This is the simplest and often most delicious way to cook it. Ingredients:- 4 cups (approx. 1 medium squash) 1-inch cubed butternut squash
- 2 tablespoons olive oil
- ½ teaspoon sea salt (or to taste)
- ¼ teaspoon black pepper (or to taste)
- Optional additions: ½ teaspoon smoked paprika, ¼ teaspoon garlic powder, a pinch of cinnamon or nutmeg for a sweeter profile, or a sprig of fresh rosemary/thyme.
- Preheat Oven: Preheat your oven to a robust 400°F (200°C). High heat is key to achieving that desirable caramelization.
- Prepare Baking Sheet: Line a large baking sheet with parchment paper. This prevents sticking and makes cleanup a breeze.
- Season the Squash: In a large bowl, combine the cubed butternut squash with olive oil, salt, pepper, and any optional spices you choose. Toss thoroughly until all the squash cubes are evenly coated.
- Arrange for Roasting: Spread the seasoned butternut squash cubes in a single layer on the prepared baking sheet. It's crucial not to overcrowd the pan; if the squash is too crowded, it will steam instead of roast, resulting in mushy instead of crispy edges. If necessary, use two baking sheets.
- Roast to Perfection: Roast for 20-25 minutes, flipping the squash cubes halfway through to ensure even browning. Continue roasting until the squash is fork-tender and exhibits beautiful golden-brown, caramelized edges. The exact timing may vary slightly depending on your oven and the size of your cubes. For even more expert advice on achieving that perfect golden-brown exterior and tender interior, explore Chef's Secrets: Perfectly Roasted Butternut Squash Every Time.
- Serve: Remove from the oven and serve immediately as a delicious side dish, add to salads, or incorporate into grain bowls.
